Showing posts with label baking. Show all posts

Friday, March 30, 2012

Cardamom dry fruit cake


A day to go to reach a small milestone in my own blogging world.  Thank a lot to all of the enouragement.

Milestones have to celebrated, right? Right. So to celebrate the milestone and as a Thank You for all of you who dropped by, here is a Cardamom dry fruit cake. A simple cake with a lots of flavor. Often I try cakes using condensed milk , but this cake I tried with evaporated milk.

Ingredients :

1 1/4 cup -- All purpose flour
1 cup  -- Evaporated milk
3/4 cup -- Light brown sugar
2 nos -- Ripe banana
6 tbsp -- Unsalted butter
1/4 tsp -- Salt
1 tsp -- Baking powder
1/2 tsp -- Baking Soda
2 nos -- Cardamom
1/2 cup -- Chopped nuts and dried fruits


Method :
--- Pre-heat the oven to 170 C or 350 F.
--- Grease a 8" pan with butter.
--- Heat the evaporated milk along with sugar and butter, until the sugar dissolves. Let the milk to cool.
--- Meanwhile shift the flour, baking soda and baking powder.
--- Powder the cardamom and add to the dry mixture along with the dry fruit.
*** Here's a small tips to powder the cardamom. In a blender take few spoons of flour and add the cardamom and blend it  to fine powder. If using for any other sweet or dessert, blend the cardamom with few spoons of sugar. So that you will not get the cardamom pods while enjoying the dessert.
--- Mash the ripe bananas without any big lumps and mix it to the milk mixture. Add a 1/4 tsp of salt to it.
--- Add the dry ingredients in batches to the wet ingredients and mix well. 
--- Pour the cake batter into the greased pan and bake it for 25 to 30 minutes, till its done and a tooth pick inserted comes out clean.
--- Cool the cake completely before serving.
--- You can serve the cake with or without frosting.
--- I frosted my cake with a thin layer of simple banana chocolate cream and dusted with dry coconut flakes and sliced almonds.

You can enjoy the flavor of banana, coconut flakes, cardamom and dry fruits in every bite.

Friday, August 26, 2011

Walnut brownies

 Hmm... More chocolate coming on your way to dazzle you. Followed by Hazelnut chocolate fudge  here comes walnut brownies.


Nearly, after 9 months I baked this mouth watering walnut brownies. Remember long long ago, I tried a walnut brownie with chocolate fudge recipe and those brownies turned to brownie walnut balls. To read more about that scrumptious walnut brownie balls, click here.

I tried some new ingredients to substitute eggs. Though it is an experimental recipe, the outcome was perfect. The brownies were soft, moist and delicious.

Ingredients :

1 cup -- All purpose flour
1/2 cup -- Cocoa powder
3/4 to 1 cup  -- Granulated sugar**
1/2 tsp -- Baking powder
1/2 tsp -- Baking Soda
1/2 cup -- Walnuts
5 tbsp -- Butter
1/4 cup -- Condensed milk  (optional)**
1/2 cup -- milk
1/4 cup -- Paneer
1/4 cup -- Banana smashed
2 tsp -- Espresso coffee

Method :
--- Preheat the oven to 350 F
--- Grease a 8" square pan and with wax paper. I strongly recommend to use a wax paper, but as I did not have wax paper in stock when I tried this recipe , I ended with brownie walnut ball.
--- Grind the paneer cubes to a fine powder.
--- Mix the paneer to the sugar, smashed banana, espresso coffee  and milk. If using condensed milk, mix it also with paneer banana mixture.
** I had some left over condensed milk in the refrigerator, so I added the same.
** Brown sugar would have been wonderful, but i had to make do with granulated sugar. If not using condensed milk, adjust the sugar accordingly.
--- Melt the butter in a pan and mix the cocoa powder.
--- To the cocoa mixture add the banana paneer mixture.
--- Shift the all the rest of the dry ingredients. All purpose flour, baking powder and baking soda.
--- Mix the dry ingredients with the wet ingredients.
--- Last but not least, add the walnuts to the batter and mix well.
--- Pour the batter on to the pan and bake it to 25 to 30 minutes until a tooth pick inserted comes out clean.

Enjoy the brownies with whipped cream or serve hot with cool vanilla Ice cream and chocolate fudge topping.

Friday, January 28, 2011

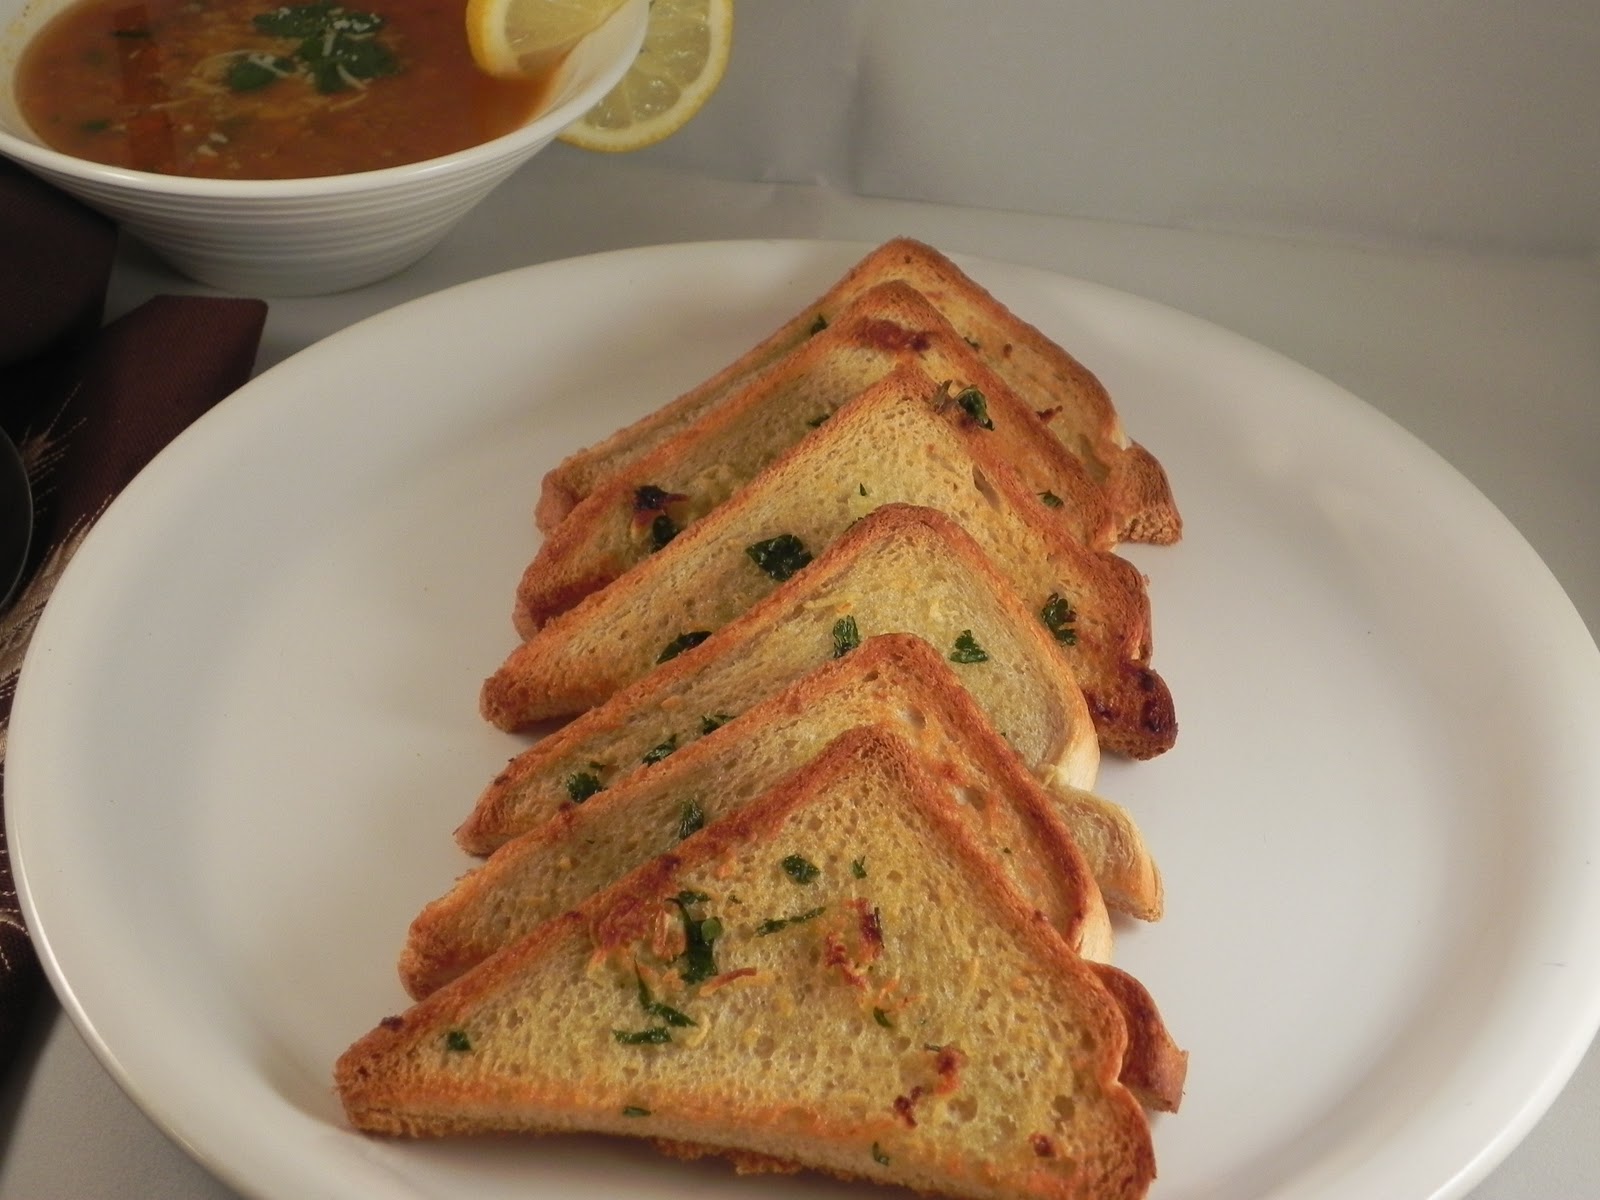
Garlic bread


Are you sitting in the couch and wondering what to serve your loved one for the dinner? or Thinking to have something warm and crunchy to fight the bone chilling cold ?
It happens to me more often. I always wanted to cook something different for Karthik and surprise him when he comes back from office. Most of the time, I make something very easy and healthy, so that I can enjoy the food and have less cleaning work.

A couple of days ago I came across the recipe for Garlic bread. Its very simple, easy to make, minimal number of ingredients, no messy cleaning work. Takes less time to prepare this nice crunchy, garlicky bread. And no one can go wrong with this recipe.


Ingredients:
Bread slices -- 8 slices***
Garlic -- 2-3 cloves (depending upon the size)
Salted or Unsalted butter -- 1 tbsp
Olive oil -- 2 tbsp
Cilantro --  few leaflets***

*** You can use any kind of bread. I used whole grain white bread.
I wanted a mild taste, so I went with cilantro. If you like you can use any kind of herbs for topping. Parsley, powder onion, dried oregano, etc.

Method :
--- Preheat the oven to 375 F
--- Melt the butter and add olive oil. Grate the garlic and chop the cilantro and add in to the butter oil mixture.
--- Now take the bread and arrange them on a baking sheet. If you like cut the bread diagonally.
--- Brush the butter oil mixture over the bread and bake it for 10 - 12 minutes.
--- After 7 minutes, you just turn the bread and bake for few minutes.
--- VoilĂ , freshly home made Garlic bread ready to serve. 


You can serve this crunchy garlic bread for an evening tea with tomato sauce dipping or with a nice soup for a dinner. Enjoy !!!

Friday, January 14, 2011

Mac and cheese cupcakes

A surprise gift from my husband and a silk saree along with sweet parcels from my in-laws, wishes and blessings from my parents, facebook messages, phone calls from friends, microwave oven from Karthik's friends, what else I will ask God on a birthday. Everybody made my day very special.

Since I was busy with the phone calls in the morning, I didn't cook anything for the lunch, did a simple yet delicious kesari. I like kesari a lot, my mom always make kesari on my birthday. I wanted to surprise my husband with the special food for the dinner.

I did a couple of different recipes which I did not tried before. One such recipe is this.
'Mac and cheese cupcakes' - These are cutie little pasta, cheese basket with some veggies in it.

Long time ago, I tried a similar kind of pasta cheese cupcakes in a baked potato basket. It was an experimental recipe, combining two different recipe which I saw in the Food network show. I named the new recipe as 'Potato Pasta Basket', you can find the recipe here. On my birthday I wanted to try the same recipe but wanted to have it simple. So I did cheese cupcakes without Potato basket. This is the Gaida's recipe from Food network program.

Ingredients :

2 cups --- Cooked pasta***
1 cup --- Sharp Cheddar cheese
1 cup --- Mozzarella cheese
1 cup --- Cherry tomatoes halved
1 cup --- Spinach chopped nicely
1 cup --- Bread crumbs
Olive oil to drizzle
Salt and Pepper for taste
***Any kind of small shaped pasta, I used 100% wheat crown shaped coloured pasta. Cook the pasta as per the instruction given.

Method :
--- Preheat the oven to 370 F
--- Grease the muffin tray and dust with the bread crumbs. This will help the cupcakes to take out of the pan easily, or else the cheese will stick into the pan a lot.
--- Mix the spinach, tomatoes with salt and pepper and keep it aside. You can use any kind of vegetables in it. Blanched beans, broccoli, zucchini, eggplant ...
--- Fill the half of the muffin pan with cooked pasta.
--- Add some cheese of your favorite on top of the pasta.
--- Now add the mixed veggies over the cheese and again top them with the cheese layer.
--- Over the cheese layer, add left over pastas or veggies if any. Or else top them with the bread crumbs, approximately 11/2 to 2 tsp.
--- Drizzle some olive oil on top of bread crumbs.
--- Final layer again with loads of cheese.
--- This is simply layering different veggies, pasta and cheese inside the small pan.
--- Bake them for 12 - 15 minutes, untill the cheese are melt on top, also you can see golden brown color on sides.
--- Before taking them out, give some time to cool the cupcakes.


Thanks to Gayathri, (Kitchen - The Chef's Paradise), when she called to wish me, she suggested me a key ingredient 'spinach' for this cup cakes, when I was stuck in a confused stage. You can hide more veggies inside the cheese and can make kids to eat. This Mac and Cheese cup cakes are kids friendly dish.
You can also serve these cutie little cupcakes as an appetiser for any party. Easy and different, I got more applause for these cuties !

Sunday, January 9, 2011

Peanut butter cookies


I like to eat the peanuts only in two dishes - peanut laddu / kadala mittai and in my mom's eggplant kootu. I don't like peanuts in any other dish or in any other form. It doesn't mean that i will not eat or cook foods using peanuts, but those two are my favorite dish.

You know, I stopped eating more chocolates and Ice creams here. Some of the chocolates have peanuts and all the ice creams are topped with peanuts. But I like to see the 'Jif' peanut butter advertisements. Oh, they are very nice and lovely. The kids featuring in those ads will be very cute. Since I like the advertisement, I wanted to taste the butter at least once.

I tried this cookies from  Dhivya's Dil se... blog four days ago. They tasted delicious. The cookies were flaky and soft. Everybody certified that this was the best cookies I ever baked. I baked nearly 50-60 cookies and they were all gone in 48 hours.

Ingredients and Method :
I followed exactly the same from Dil se..., you can click here to find the recipe.


From now on, I will add this peanut butter cookies in my favorite peanut list.

Saturday, January 1, 2011

Welcome 2011

Wishing you all a very happy and wonderful New Year!!
 Year 2010 left many good memories and brought many new friends. It was a very special year for me. Thanks to all followers and fellow bloggers for your support. When I started the Preethi Bhojan, I did not know anything about the food bloggers community, about the events they conduct, how to present a recipe, but now my whole world has changed.

Hope 2011 also brings me many more friends to me.

On new year day in my home town, early morning we go to a Perumal kovil near our home . Morning twilight, margahzi month chill mist, big rangoli kolam to welcome new year, a divine smell inside the temple, prasadam, Tulasi thirtham, Oh I am missing them. But not the chillness, because it is biting cold here.

This is my first post of the year, so let us start with the super double layered chocolate cake and welcome the new year.

I baked this cake for a dual purpose, new year special and for my project submission. As I mention in my earlier post, I did this cake for my cake decoration class. Since the theme and designs were our choice I selected this theme. So what theme in this?

I started with a winter theme and ended with a sunny theme. Winter theme, blue sky, tall tree branches without leaves, nice fresh snow and a welcome message for the new year. As I started working on the decoration, I changed the whole theme. Now this represents the Bahamas . Blue sea, Brown shells, big flowers, green branches. This theme is like modern art, so visualise the Bahama beach and look into the cake again, you will get it !

For recipe, click here
Followed the same recipe, which I posted last year in my another blog. I am having a 10 " pan now. So I increased some ingredients.
*** All purpose flour -- 1 and 3/4 cup
*** Sugar -- 3/4 cup
Rest all the ingredients and the methods are same.


Since this was a big and tall cake, I was able to to share the joy along with this cake to many of my neighbours.

photo from Google Images


Wednesday, December 22, 2010

Christmas cookies continues...

Here comes another Christmas treat in my cookie series.

Pinwheel Cookies
Zebra cookies
Gifting home baked cookies is the great way to celebrate these holidays. But why settle for one type of cookies when you can easily have many ?

One base
recipe
+   Some
  magic  
=    Bourbon biscuits
   Choco cookies
   Pinwheel cookies
   Zebra cookies

Doesn't the above equation reminds you the old chemistry class or Maths Theorem class ?
This is the secret formula for my Christmas cookie treats. By keeping the bourbon biscuit recipe as my base recipe I did little variation and did 3 more kind of cookies. Thanks to Nithu's kitchen, the Bourbon biscuit now got two more little sisters, Pinwheel cookies and Zebra cookies.

For both the cookies, I used two coloured cookie dough with single recipe.

Ingredients :

One layer -- the chocolate layer the ingredients same as the choco cookies.
Second layer -- Plain one, except the cocoa powder and instant coffee.

Preparation  :
--- Prepare the two separate dough as mentioned in the choco cookies. Don't make the dough  more soft. Play with water and make sure all the crumbs are held together and knead the dough.
--- Wrap both the dough separately and refrigerate it for an hour.

*** Click here to find the recipe and the method to prepare the dough

Method - for Pinwheel cookies
--- Preheat the oven to 350 F
--- After an hour, take both the dough out from the fridge, unwrap them.
--- Take either one of the dough, divide the dough into two equal parts. Roll one dough to 3-4 mm thickness on a parchment paper and make approximately  10" x 8 " rectangle.
--- Follow the same  procedure for another color dough and make another rectangle.
--- Place rolled white dough on to the chocolate dough, press gently to make an even layer.
--- From one end, start rolling the rectangle dough tightly and form a log. Wrap the log and refrigerate again for an hour.
--- Follow the same step for the rest of the dough.
--- Take the dough and cut 1/4 inch thick slices. Now you can see nice two coloured swirls.
--- Place them on the cookie sheet and bake it for 10 - 12 minutes.
--- Once baked, cool it and put it in air tight container.

I did not roll tightly the first set of dough and also did not refrigerate it. So the dough was little flimsy and I was not able to cut the log properly. This led me to Zebra cookies.

Here comes the method for making these cookies.

--- Since the log was flimsy I was not able to cut the dough log in proper round. So I cut the log  to 1/2 inch  plus thickness.
--- Then cut the 1/2inch dough vertically, flattened it and formed a round shape. I got uneven color on the flattened uncooked cookie.
--- Made some impression using the fork, sprinkled some raw sugar. Placed on the cookie sheet and baked them at 350 F at 10 - 12 minutes.

These cookies were a big hit, my husband still asks me how I made the patchy effect on the Zebra cookies and the double swirl effect on the Pinwheel cookies.

Tuesday, December 21, 2010

Christmas choco cookies

When I think of Deepavali, the first thing strikes my mind is the fresh smell of new clothes, next comes the smoke of crackers and different kind of sweets and savories. When I think of Christmas, it is decorations, Christmas tree, exchanging gifts and baking delicious cookies and cakes. It is just 4 days to Christmas and I like to drive through to see the light decorations in the night. It is very nice to see the houses, malls and the streets decorated with hundreds and thousands of lights.

My holiday celebration started from the Thanksgiving day. Windows are decorated with the cute multi coloured  LED lights and a kutti Christmas tree as a center piece of attraction. As a final part of the celebration, here comes the Christmas treat.


Baking cookies and cakes at home is a holiday tradition. Ginger bread, sugar cookies, butter cookies and cookies cut into various shapes related to holiday themes, fruit cakes... So many varieties.

Choco cookies
Infact, these choco cookies are ' little sister ' of the Bourbon biscuits, which I tried from Nithu's Kitchen. I used the same recipe, instead of filling the cream in between the two biscuits I used it to decorate on top of each cookie.

Ingredients :

1 cup -- All Purpose Flour
1/4 cup -- Butter
1/2 cup -- Sugar
1/2 tsp -- Instant Coffee Powder**
1/2 tsp -- Baking Soda
1/2 tsp -- Baking Powder
2 tbs -- Cocoa
1/2 tsp -- Vanilla Extract
4 - 5 tbs -- Milk
** Instant coffee powder is optional. But always try to use instant coffee are freshly brewed coffee when you are using chocolate in any recipe. This will enhance the chocolate flavour more.

Method:
--- Preheat the oven to 350 F.
--- Mix the sugar and butter along with the vanilla extract.
--- Sieve all the dry ingredients (Flour, Coco powder, Baking powder, Baking soda) except the instant coffee.
--- To the dry mixture, add the instant coffee. If using fresh brewed coffee, you can add along with the sugar butter mixture.
--- Slowly add the dry mixture to the wet ingredients and mix well. If required add milk half to one tsp at a time to the mixture and form a dough.
--- Take the dough and roll them to 3- 4 mm thickness on a plastic sheet and cut them according to desired shape and bake it at 350 F for about 12-15 minutes.
--- Once the cookies are out, cool them completely before doing any decoration on it.

Photobucket


This is a very simple cookie. To have a celebration touch I decorated these cookies with the store bought Icing tube, resembling the snow effects.

Tuesday, December 7, 2010

Coconut Macaroons

Yesterday was my husband's birthday. I made couple of dishes and gave a sweet surprise to him.
Banana cake with Fondant Icing topping and Coconut Macaroons


I wanted to serve this lovely white macaroons with a nice cup of coffee on birthday morning. But I ended up doing that the day before his birthday.  You want to know why? It was a lovely cold white Saturday morning. It was snowing outside, first snow fall of the year. The white crisp snow very much reminded me the white fluffy flaky coconut macaroons.  How can anyone control the temptations ?


I found this lovely recipe in a magazine that I was reading at the library. I frequent the food and health related magazine section in the library and always have a  piece of paper handy in case I come across an interesting recipe. This one came that way. But this recipe is special to me. This had a nice story behind it.

A 10 year old girl, name Sabrina Shefer doing 5th Grade from Minooka, Illinois bakes these Coconut macaroons for a cause. She bakes these lovely macaroons and other cookies the earlier day and goes to farmer markets early morning along with her brother and sell them. And all the money they earn goes to the charity. How sweet...

What a fool am I,  forgot to note the magazine name and the charity organisation that she works for. But clearly taken the recipe of hers :(

Ingredients :

2 1/2 cup -- Unsweetened shredded coconut
1/3 cup -- All purpose flour
2/3 cup -- Condensed Milk
1 tsp -- Vanilla Extract
1/2 tsp -- Baking powder
1/8tsp -- Salt
1/2 cup -- Nuts (optional)

Method :
--- Preheat the oven to 350 F
--- Mix the flour, salt, baking powder and condensed milk, Vanilla extract thoroughly without any lumps
--- To the mixture add the shredded coconuts, nuts and mix well. Make sure all the coconut are well coated with the flour mix.
--- The mixture will be more sticky.
--- Just take a small heap of coconut mixture and place it on the greased cookie sheet. Don't make any balls out of it.
--- If using ice cream scooper, it will be well and good. If you trust your hands, better grease a little with butter and do it, so that it will not stick to your fingers.
--- Bake the macaroons at 350 F for about 15 to 20 minutes, until you see golden brown color on the edges.

--- Don't bake it for too long, the coconut will start to burn at the bottom, check for the golden brown colour carefully.


My husband was so happy and truly surprised. Both enjoyed the chill morning with the coconut macaroons and hot coffee

UPDATE 20-Dec-10
Oops, I forgot to mention about adding vanilla extract earlier. Have corrected it now.
Thanks to 'Anonymus' for pointing it out.

Friday, December 3, 2010

Bourbon biscuits


A glass of warm milk and plate of freshly baked Bourbon biscuits, Oh its great !
Bourbon biscuit is one of our favorite biscuits from the childhood. We all grew up eating this biscuit. Hope everybody agree with me. Even last week we bought two pack from an Indian Grocery and finished it on our way back from the shop. FYI, the distance from the shop to our home is only 2 miles. We can't stop eating after having one. I like the large crystal sugar on top of the biscuit.

I used to wonder how they make this biscuits. Even in my dreams I never thought of baking one by myself. 
But I did it, I baked my all time favorite Bourbon yesterday.
Thanks to Nithu, she commented in couple of my earlier posts. When I visited her space the first post I saw in 'Nithus's Kitchen' was Bourbon biscuit. Can't believe by myself, can we do these biscuits at home? If yes, then why shouldn't I try at once ?

Whenever I am trying a new recipe, always I will call my husband and tell him . About this Bourbon, I didn't give him any clue. Wanted to surprise him. Quickly went to the kitchen, took all the ingredients and started working on the biscuits. Since its our favorite one, I doubled all the measures.
Did a couple of changes from the original recipe.
**Instead of granulated sugar, I used Brown sugar.
** And I used 1/4 cup Vegetable oil and 1/4 cup butter. This is because I had only one butter stick, I needed 1/4 for cream, so...
Rest all I followed the same from the original recipe For the recipe, click here


The biscuits turned out perfect. Indeed my husband was little shocked on seeing this. He was so happy and announced that from now on he is going to stop buying outside. How is it !

Wednesday, December 1, 2010

Healthy quick snack


First flurries of this season drizzling outside and I am feeling chilly and cold inside. Wanted to munch something hot to warm up myself from the cold. The first thing came to mind are Pakodas.

Sometimes if it is raining, my mom will make crunchy hot fried items like Pakodas, Bhajjis and Vathal. We all sit and enjoy eating under soft glow of candle light, this is because of the Power cut in India. As you all know if its electricity department see a lightning or a thunder they will switch off the power. Oh God, when this is going to change in India?

Now coming to my story, I wanted to eat hot crunchy pakodas at the same time I wanted it to be healthy. This again because of the spark from the sudden flash on Sunday. Didn't you read that yet, click here to know more about it.

I baked the pakodas, which I tried from Trendy Relish. To make little more healthier I added some vegetables in it. The recipe is very simple and easy. Hardly I spent 10 minutes to prepare and 20 to 25 min for baking.


Ingredients :

1cup -- Chickpea/Besan Flour
3 tbsp -- Rice Flour
I no -- Medium size onion
1 cup -- cut vegetables**
2 no -- Green chillies
Salt as per taste
Oil

** I used some green and orange bell peppers, Cabbage.
I stopped using baking powder for this, as this is baking well for me. But in the actual recipe they used 3/4tsp of baking powder. So the choice is yours.

Method :
--- Preheat the oven to 400 F
--- Mix the dry ingredients well.
--- Add cut vegetables, green chillies and onions to the dry mixture .
--- To the mixture add 2 tsp of oil.
Oil will give some crisp effect to the pakodas. You can very will omit this.
--- Add water little by little to the mixture, until everything binds well. If its little watery no problem, add some more flour and adjust.
--- Line the cookie sheet with Parchment paper, otherwise the batter will stick into it. I spoiled one cookie sheet like this. Experience talk :))
--- On the sheet, take the batter in small portions and arrange them. No need to give more space in between each uncooked pakodas, since its not going to expand like cookies. But make sure they are not touching each other,
--- Using pastry brush, brush some oil on the uncooked pakodas. This is get a nice golden brown color on the pakodas
--- Bake it in the oven for 20 to 25 minutes. After 10 minutes, take the sheet out and turn the pakodas and brush some oil and bake for another 10 to 15 minutes.
--- After 15 minutes healthy crunchy snack is ready to serve.
This is one of the best way to make kids to eat vegetables.

Whole Wheat Pizza

Did anyone say NO to pizza ? That too if it is made of cent percent healthy stuffs.


Last Sunday, I took the kitchen cleaning job. Though I live in America, still my litchen is very Indian. Like our mom does in her kitchen, I changed all the kitchen cabinet papers and put them a new one. When I was doing so, I came across an article from a health magazine, which I was using to put inside the cabinets.
'7 Steps to eat clean and healthy food in the dirty world'
  1. Be a (Mostly) Vegetarian
  2. Eat Organic
  3. Skip the White stuff
  4. Count the ingredients
  5. Identify it
  6. Eat the whole thing
  7. Ban the brew
Suddenly, a light flashed inside me. Being a vegetarian, at least I should follow some simple steps to stay healthy. This Whole wheat pizza is the one spark from that flash.
This is 100% whole wheat pizza with lots of green vegetables and cheese. In my dictionary, Pizza means cheese and cheese means Pizza. Everybody might think that this girl has put this much cheese on her pizza and still calling healthy. Oh yes, the main highlight in this Pizza is the cheese. Its a gluten free, cholesterol free with 0g trans fat. I found this amazing cheese alternative from 'Whole Foods' organic shop.

You can find lot different flavoured cheese alternative in this brand. I am a big fan of this. These cheese alternatives are best substitute for the fatty cheese.
Twice I bought whole wheat pizza crust, wanted to try the same at home and the result was very encouraging. I would like to share the recipe, so you all can also enjoy a healthy comfort cheese pizza.


Ingredients :

For Pizza Base:
3 & 3/4 cup -- Whole wheat flour
1 pack -- Dry yeast
2 tsp -- Olive oil
1/2 tsp -- honey / sugar
1 tsp -- Salt

For Topping
2 to 3 cups -- Rice shreds cheese alternative**
1/2 cup -- finely chopped green and yellow bell pepper**
1/2 cup -- finely chopped onion**
1/2 cup -- sliced tomatoes**
1/4 cup -- Organic tomato basil sauce**
**Above are the things which I used, you can always change or add your style of toppings.

Method:
--- For pizza base, take a cup of  Luke warm water to activate the dry yeast. The water should be neither hot or cold. I do not have any food thermometer at home. To activate the yeast I take half a cup of water. Put it on the stove for about 30 - 40 seconds and switch off the heat and add remaining half cup water. This is my small trick to activate the yeast. If it works to you, share it with me.
--- In the warm water add the full pack of yeast and honey / sugar. Let this mixture stand for 5 minutes.
Warm water is to activate the yeast and Sugar/ Honey is the food for the yeast.
--- Now you can see a thick layer of foam over the water, if not probably the yeast is not activated. Better luck next time, you have to try again with fresh pack.
--- When the yeast is ready to use, mix it with the wheat flour + salt. Add water in little, as you start kneading the dough.
---  Once the dough is ready, apply the oil over the dough and cover it with a damp towel for couple of hours.
--- This is the time span yeast will take to grow. After an hour you can see the whole dough has doubled in size.
--- Knead the dough and again keep it for an hour.
--- Pizza dough is ready to roll. Cut the whole dough into four quarters.
You can make a 9" pizza from a quarter, if you  are not going to use all, take unused dough apply olive oil and put it in a zip log bag and throw it inside the freezer, it will last for minimum 2 month.
--- Roll the dough to 1/4" thick, add the toppings and bake it in the oven for 425 F for 12 to 15 minutes.
Yummy, cheesy, healthy pizza will come out of the hot oven.

Now tell me, did anyone say NO to this organic healthy pizza ?

Thursday, November 25, 2010

French fruit cake

Baked this cake last Sunday, for a birthday party.


Wanted to surprise all with a different cake than my usual one. I was planning a cake with lots of decoration using the fondant icing. Since I did not have enough knowledge about it,  was little afraid to take a risk on a birthday cake. When I was talking about this with my husband, he suggested me to use some fresh fruits in the cake, because he likes my Pineapple upside down cake a lot. This kindled some idea and planned to decorate the cake with colorful fresh fruits.

Birthday means colorful, fun and joy. So I did colorful cake. Double layer Chocolate cake, white color frosting cream, and fresh fruits on top, sliced almonds with skins on sides.

Ingredients :

For Cake recipe
 2 1/2 cup -- All purpose flour
 1/2 cup -- Cocoa powder
 1 tin -- Condensed Milk
 1 cup -- Butter
 3/4 cup -- milk
 2 tsp -- Vanilla essence
 2 tsp -- Baking powder
 1 tsp -- Baking soda
 1 cup -- Chopped nuts and Raisins
 7-8 -- Sliced Pineapple rings**

For Decoration
 2 box store bought whipping cream
 Fresh strawberries halved**
 canned Orange**
 Sliced skinned almonds

Method:
--- Pre-heat the oven to 350 F, and grease the 2 nos of 8"pan. If you are having only one, not to worry  grease one pan and keep it ready. Once a cake is baked we can bake other in the same.
--- Melt the butter and cool it. Add milk, condensed milk and mix thoroughly.
--- Shift all the dry ingredients. APF, cocoa powder, baking soda, baking powder.
--- Add the dry ingredients in batches to the wet ingredients along with Vanilla essence.
--- Mix well and make sure there are no lumps. Now add the nuts and raisins to the cake batter and fold the batter from the center to mix the dried nuts and fruits.
--- **I wanted a layer of pineapple in between the cakes, so in one pan I arranged the pineapples rings on the bottom.
--- Pour the cake batter in both the pans. Eyeball measuring half quantity in each pan.
--- Bake the cake in 350 F for 35 - 40 minutes. If using two pans, keep changing the pan in the racks in equal time interval for even baking. If using one pan, bake a cake first, cool completely then take the cake out. Wash the pan, grease it and follow the same procedure.

--- Once both the cake are done, cool the cake completely.
--- Mix the whipping cream with a dry spatula and keep it ready.
--- With a knife cut the top bulged portion of the cake. Apply a little cream in the center of the plate or board in which you are going to mound the cakes. This is to avoid the movement of cake on the board or plate.
--- I kept the pine apple cake as a down layer. If you are doing without that, keep any of the cake. Upside cut portion to be kept down. Now apply the cream on the top.
--- Take another cake and place it on the cake with the frosting, make sure you are keeping the cut side down. Again like upside down.
--- Using a clean big spatula, apply generously the icing cream on the sides and then gradually move to the top. If you feel the icing is little too jelly to handle the icing on the cake. Keep the cake into the freezer for 15 to 20 minutes and then work again.
--- If you see some dents and marks on the icing, no problem. We are going to apply a nice nutty layer on the sides which will cover everything.
--- Take handful of sliced almonds and pat it down on the sides.
--- On top of the cake, according to your desire decorate with strawberries and oranges.
--- You can use any fruits and decorate. No STOP sign for your imagination

Photobucket


Monday, November 1, 2010

Chocolate Cake Balls

Happy Halloween.
Isn't the cutie nutty balls are attracting you to grab one ?


Last Thursday, we went out for a 3 day trip to Smoky Mountains with couple of our friends. For any trip, I always take our foodie bag with lots of food which can stay for a couple of days. This time my husband wanted me to make Choco cup cakes for the trip. Since we planned to start in the evening, I spent the whole day in cooking. I had the Choco cakes as a last item in my list, because it will take only 30 - 45 min.

The clock flashed 4.00 and I tuk, tuk grabbed all the ingredients and made the choco cake batter. Turned the oven on to 350 F and poured the batter into the tray and baked it. Once done, took the tray and kept aside for the cakes to cool. The cup cakes were looking exactly the same as I baked last time. Meanwhile I was getting ready and packing all the baggage.

I was so happy and excited to take those cup cakes out from the muffin tray, unfortunately I couldn't :((
Those cup cakes were not coming out of the tray. Think, I forgot to grease and flour the tray in a hurry. Though the cake was fluffy and nice, I was able to take only the top part not the whole cake. Sad story !
Didn't have anytime to think about the cakes, wrapped the tray and placed it in the fridge and went. We were back from the trip on Monday. Wanted to do something out of the cake, which is lying in the fridge for 4 days.

While searching for a recipe to fix, found this Cake balls recipe, for a moment I went ..... speechless. Next second, felt so happy and relived from a great tension.
This is the best recipe when we have cake leftovers. Easy to make and tasty to eat.
Here comes the recipe...

Required Ingredients
--- Left over cake (I had chocolate cake with lots of nuts and choco chip)
--- 1 box Frosting cream (I used store bought Pillsbury, Vanilla cream)
--- 1 pack Mini Chocolate chip ( I used Semi sweet)
--- Nuts (optional)

Steps
--- Scratch the cakes into very small pieces.
--- According to the cake quantity, add the frosting cream and mix thoroughly.
--- Make small balls.
--- Line all the cake balls in the cookie sheet and refrigerate it for 3-4 hours
--- Once the cake balls are harden enough, Melt the chocolate chips and dip the above cake balls.
--- Again refrigerate all the balls.
--- You can serve these balls with chocolate coating or else you can roll them over the nuts and also form a nutty layer on top.
--- Either way the balls will be delicious to eat.

Photobucket


Sending this chocolate treat to Madhuri Kumar's, Cook-Curry Nook for her 1st Anniversary celebration.

Wednesday, September 29, 2010

Pineapple Upside down Cake

I baked this delicious looking and tasting Pineapple upside down cake yesterday. Doesn't this look pretty !


You all might be wondering where this girl vanished suddenly. She has been cooking and baking so many dishes and giving sweet surprises to her in-laws. What to say friends, my in-laws shortened their stay here and flew back home last Monday :(

I am having so many new informative things and recipes to share with , but since the time they left the home seems so empty and dull without all the constant buzz . Absolutely no cooking for first 3 days and survived with frozen rotis. Slowly I recovered and started seeing my routines in Food network shows. In one of the show I saw a similar cake using corn meal, so wanted try it. Same day I bought cherries and pineapples.

I will always take a month to try a recipe after book marking it , luckily this time I tried Pineapple upside down cake within two days. Found this wonderful recipe from " Cooked Dil Se..." by Siddhi. This is again a recipe where I faced couple of challenges.
First thing in the morning found my oven door broken and thanks to my apartment guys, for fixing it quickly. The original recipe has a stick of butter. Oops, I forgot to buy it.  Want to know what I did, tadaan, replaced it with 1/3 cup of vegetable oil.  Also added lots of walnuts and Raisin for more taste.

That's it poured my cake batter on top of  pineapple and cherries and baked it for 40 minutes in 300 F. Once baked cooled the cake in the pan for some minutes then turned the cake. I can't believe myself, at last I baked pineapple upside down cake... Huh huh can't wait to share with you all...

Photobucket


If you want to give it a try, you can always find the recipe here. Enjoy !!!

Friday, September 3, 2010

Dates Bread

Another bread in series. I bookmarked this recipe long back and tried this few days before. Wonderful healthy recipe.


I am a chocoholic, used to have a packet of chocolate in the fridge. Some months ago, I replaced them with  dates. More concern about my health, wanted to stay healthy, so only... I was eating regularly, after few days I stopped it, since it was too sweet.

Since we didn't eat, the whole 2 lb box was kept untouched. Long long ago, I found this recipe in "Parita's World" and bookmarked it and waited for a loaf pan. Last month, when I was shopping with my in-laws , I was telling the same above story and they bought me the loaf pan.
From that day, it has been raining breads in my kitchen.


Tuesday, August 24, 2010

Banana Bread


Bananas are the one and only fruit in my grocery list every week. Never knows how it gets over in my home. Some times my husband will have it for the break fast. I used to eat bananas for breakfast and also as main meal for my Lunch not now...! Those are the days, before my in-laws arrival.
Also I mainly use it for baking, will always use bananas in the place of eggs. So in some form we will have bananas daily.

Last week, we had left with over ripen Bananas. From the day it started to change color from normal yellow to golden yellow, my mother in law was asking us to eat. Me and my husband found the jar of cookies more tempting. After a day, the color of the banana changed more, the black dots over the skin spread all over the banana. Neither I liked to eat it or to throw. So decided to bake cookies using it.

I wasted one more day and the bananas were looking very bad at this point, the skin was totally blackish, but fortunately the fruit inside was unspoilt. I searched for a new dish and found one but I could not try that as the quantity of banans that I had was not sufficient. Planning to make tomorrow, if it turns out well sure I will share with you.

With the above mentioned 2 bananas, I did banana bread, from 'Medhaa's' blog. It was a big surprise to my in-laws and to my husband, because I just went inside the kitchen and came out with a lovely, tasty bread. Didn't gave them any hint about baking.

Recipe here.

Tuesday, August 10, 2010

Need another attempt

In my earlier posts I have been sharing you about my hits in the Kitchen, under 'Tried and Tasted'. This post for a change I am going tell you all about some recipes,  which I think need more work.

Stuffed Potato


I just steamed the potatoes for few minutes. Then cut into halves and baked it at 400 F for 10 minutes. Then cut the potatoes in to two halves. Scooped the potatoes leaving a thin layer with the skin. Again bake the potatoes for 20 more minutes. The crust will be crunchy now. Don't throw away the scooped potatoes.  Mix the potatoes with cream cheese and season with salt and pepper as per taste. Just for a small crunch I added carrots.
My husband loved it. But still I am not satisfied with what I did. Wanted to try it again. Wish me luck :))

Potato and  Dill Biscuit

My husband love potatoes, who doesn't like it ? Answer - My sister :(( She didn't like Potatoes at all. We always call her 'Vichitra Piravi'. Ok, let me come to point. He saw this recipe in Chef in you and asked me to do this. Luckily I had all the ingredients except Dill, I replaced it with jeera. Followed all the steps and baked the biscuits.
For me it looked like roti, taste was OK. The biscuit become so hard next day. Wanted to try this again :))

Photo missing !

Sorry, no picture for this. Accidentally deleted the image from my SD card and I frantically searching for a data recovery tool to recover my images

Thursday, August 5, 2010

Fresh Plum bread


 I baked bread last week for the first time. Baking bread has been my desire for long time. As once DK said, even I used to think baking bread is only possible in the bakery and big oven. From what I gathered from many cookery blog I realised that this might be possible even at my home. So I tried a recipe from my favorite site, Chef in you


I tried this recipe using Sour cream instead of Butter milk. Also I topped this bread with lots of walnuts and oats. After an hour the aroma filled the whole house. After waiting for few more minutes, delicately took the bread from the pan.

This is again one more sweet surprise to my in-laws. It tasted little sour, sweet with each bite leaving a rich and delightful taste of plum and nuts. If you like to try this bread, pls click here .